Written by Lucas Braga, DevOps Engineer and Adithya Bodi, Demand Generation Manager
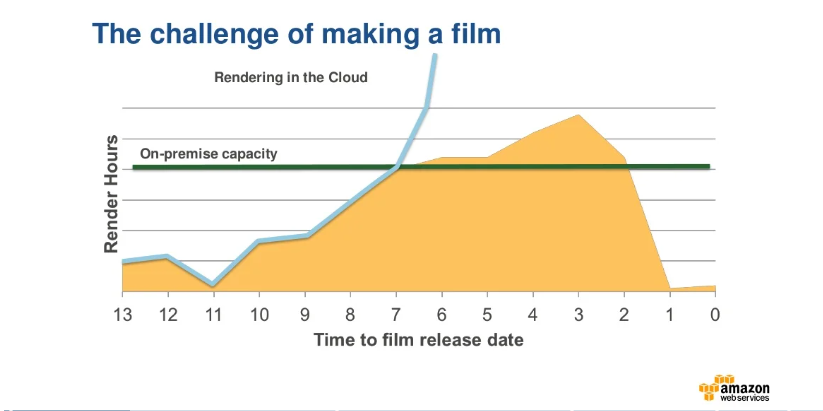
VFX and animation studios are regularly faced with the challenge of shrinking budgets and a limited on-prem capacity unable to accommodate peak rendering requirements at the tail end of projects. Leveraging cloud-based render farms allow studios to address both these challenges simultaneously by scaling rapidly and cost-effectively.
This article discusses the process of leveraging Amazon EC2 Spot Instances with the Deadline Spot Event Plugin to address rendering requirements in a cost-effective manner.

Contents
Amazon EC2 Spot and Spot Instances
Amazon EC2 Spot Instances allow users to take immediate advantage of unused EC2 capacity in the AWS cloud. Spot Instances are available for less than the on-demand price by enabling companies to request unused EC2 instances as they become available. These steep discounts can lower the overall Amazon EC2 costs significantly.
The hourly price for a Spot Instance is called the ‘Spot price’. The Spot price of each instance type in each Availability Zone is set by Amazon EC2 and is gradually adjusted based on the long-term supply and demand for Spot Instances. These Spot Instances run whenever capacity is available and can be a cost-effective choice for users who have some flexibility on the availability of applications and can tolerate possible interruption.
Thinkbox Deadline and using Spot Instances for Render Farms
AWS Thinkbox Deadline is a hassle-free hybrid administration and compute management software for Windows, Linux, and Mac OS-based render farms that supports more than 80 different content creation applications.
To take advantage of Spot instances on the cloud, the Spot Plugin was created. It seamlessly manages the creation, allocation, and deletion of dynamic nodes in the cloud. The Spot Plugin is used in the following 3 situations:
- Bursting render farms: Ideal for projects involving high workloads where there are limited on-premise nodes available. For example, assume a job has been started containing 16 frames but only 8 on-premise nodes are available. It is possible through the use of grouping and pooling to create the missing nodes on AWS.
- Special projects in which users want to leave on-premise nodes available: Users can group projects to render only with nodes triggered by the Spot Plugin. When the project is submitted nodes are created. After the completion of the project, these nodes are deleted without manual intervention.
- Full cloud pipeline: If users prefer to do all rendering in the cloud, the most cost-effective method for allocating nodes will be to use the Spot Plugin.
Using tools available in Deadline such as Spot Plugin, Groups, and Pools, studios can seamlessly address their rendering needs in a transparent and cost-effective manner.
TrackIt has recently published a detailed Tutorial on Using Deadline Spot to Burst Render Farms. The tutorial focused solely on the first scenario that applies to the majority of creative studios – Burst Render Farms that cost-effectively meet rendering requirements while reducing dependency on-premise hardware.
Conclusion
Using AWS Thinkbox Deadline, VFX and animation studios can realize significant cost savings while also achieving ideal project completion speeds with minimum hiccups and almost unlimited scalability. Studios looking for assistance in implementing Deadline Spot Instances can seek the expertise of a trusted AWS Advanced Tier Services Partner like TrackIt to maximize efficiency.
About TrackIt
TrackIt is an international AWS cloud consulting, systems integration, and software development firm headquartered in Marina del Rey, CA.
We have built our reputation on helping media companies architect and implement cost-effective, reliable, and scalable Media & Entertainment workflows in the cloud. These include streaming and on-demand video solutions, media asset management, and archiving, incorporating the latest AI technology to build bespoke media solutions tailored to customer requirements.
Cloud-native software development is at the foundation of what we do. We specialize in Application Modernization, Containerization, Infrastructure as Code and event-driven serverless architectures by leveraging the latest AWS services. Along with our Managed Services offerings which provide 24/7 cloud infrastructure maintenance and support, we are able to provide complete solutions for the media industry.
About Lucas Braga

Data Scientist by formation and DevOps by experience, Lucas has been a DevOps Engineer at TrackIt since 2021. With 8 years of experience spanning Media & Entertainment, TV, and Design, he brings a unique perspective to projects.
An out-of-the-box thinker and serial problem solver, Lucas excels at finding innovative solutions.
About Adithya Bodi

Having spent over 6 years as a consultant working with companies spanning a broad variety of tech niches, Adithya has gained deep expertise in planning and executing content marketing and lead generation strategies. Adithya has been working with TrackIt since 2018 and has taken on a full-time position to assist the company in its growth while deepening his knowledge and expertise in AWS.
Adithya has a bachelor’s degree in Applied Physics and is an AWS Certified Solutions Architect Associate. He is also an avid calisthenics practitioner, a stock market enthusiast, and a recreational painter.

