For AWS users who are beginning to shift their focus towards optimizing their costs on AWS, there’s one step that’s absolutely essential for them to take to get started in their optimization journeys – Enabling AWS Billing.
Enabling AWS Billing is the only means for you to record your billing data and to analyze the evolution of your spending over a period of time. However, there is no information provided by AWS itself that shows you how to do this. So we’ve decided to come up with a post that will walk you through the process of setting up your AWS bills.
Instructions: Enabling AWS Billing
Implement the following to enable AWS Billing:
1. Go to your Billing reports setup page and click Create Report
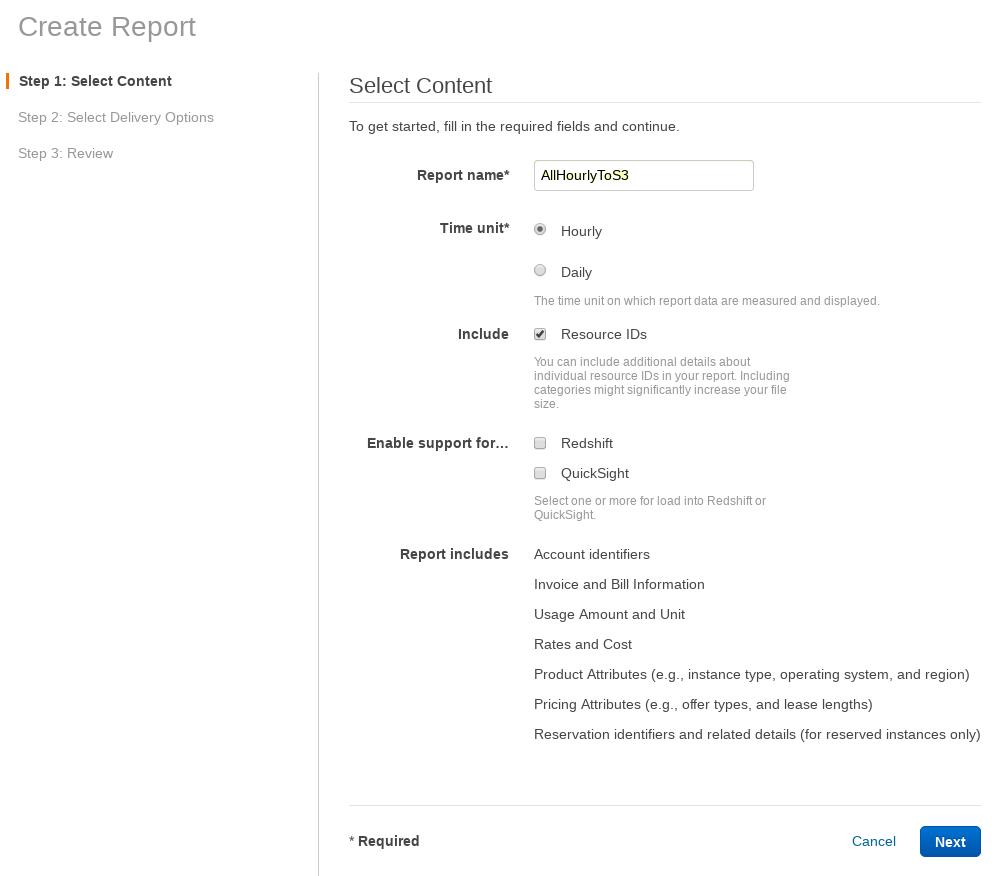
2. Choose a report name, select Hourly as the Time Unit and Include Resource IDs (see screenshot). You can then click Next

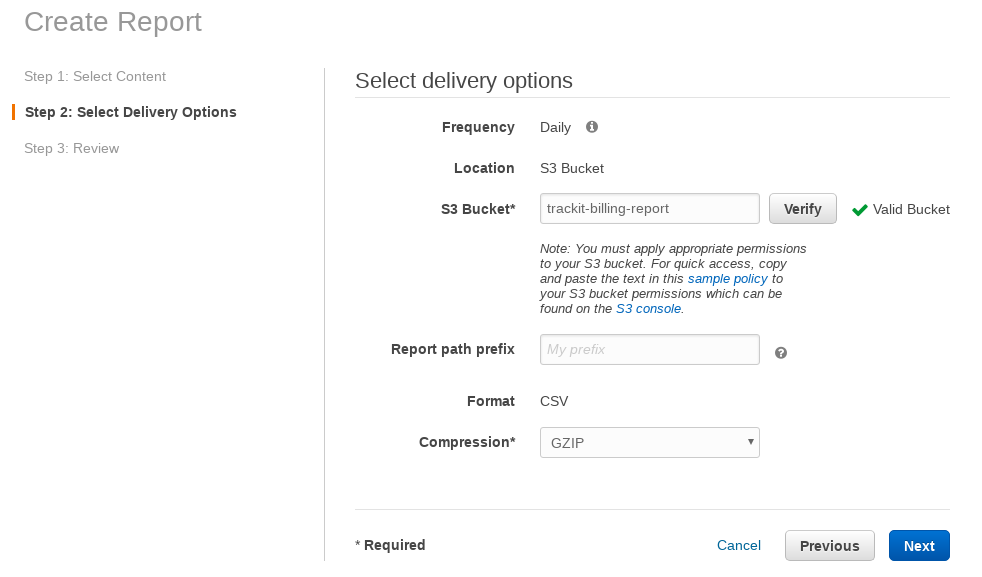
3. Create an S3 Bucket to store your bills and fill the field. You don’t need to set a Report path prefix.Select GZIP as Compression, then Submit (see screenshot). You can then review your settings and Submit again.

All in all, shifting one’s focus towards cost optimization is essential for long-term AWS users, especially those who are looking to scale. By prioritizing optimization as early as possible in your journey as an AWS user, you’ll be able to luxuriously plug any leaks you may have in your budget while they are small. And it all begins with enabling your AWS billing. This provides you with the records you need to analyze your spending and to identify areas that need to be optimized.
- Once you’ve submitted your billing report setup, you’ll be able to see your detailed billing data in your S3 bucket. The data will include the total cost of your AWS services, broken down by each individual service, as well as the amount of data transfer and the total number of requests you made.
- With the data at hand, you can now start to optimize your costs. Here are a few steps to get you started:
- Identify the most expensive services: Look at your billing data to determine which services are costing you the most. This will help you focus your optimization efforts where they’re needed most.
- Monitor resource usage: Regularly monitor the usage of your AWS services to ensure that you’re not paying for more resources than you need.
- Right-size your instances: Make sure that your EC2 instances are the right size for your workloads. If you’re using instances that are too large, you’re wasting resources and money.
- Utilize reserved instances: By reserving instances, you can save up to 75% compared to on-demand instances.
- Automate cost optimization: Make use of AWS cost optimization tools, such as the AWS Cost Explorer and the AWS Trusted Advisor, to automate cost optimization and identify areas for improvement.
Conclusion
Enabling AWS Billing is the first step towards optimizing your AWS costs. By following the steps outlined in this guide, you’ll be able to gain a comprehensive understanding of your AWS spend, and take the necessary steps to optimize your costs and achieve your optimization goals. Remember, the key to long-term success as an AWS user is to prioritize cost optimization from the very beginning of your journey.

About TrackIt
TrackIt is an international AWS cloud consulting, systems integration, and software development firm headquartered in Marina del Rey, CA.
We have built our reputation on helping media companies architect and implement cost-effective, reliable, and scalable Media & Entertainment workflows in the cloud. These include streaming and on-demand video solutions, media asset management, and archiving, incorporating the latest AI technology to build bespoke media solutions tailored to customer requirements.
Cloud-native software development is at the foundation of what we do. We specialize in Application Modernization, Containerization, Infrastructure as Code and event-driven serverless architectures by leveraging the latest AWS services. Along with our Managed Services offerings which provide 24/7 cloud infrastructure maintenance and support, we are able to provide complete solutions for the media industry.

