 AWS ECS allows you to run and manage Docker containers on clusters of AWS EC2 instances. This is done using task definition files: JSON files holding data describing the containers needed to run a service. It is the AWS equivalent of your everyday docker-compose file.
What we want today is to automate the deployment of docker-compose services on AWS, by translating a docker-compose YAML file into an AWS ECS task definition file, and subsequently deploying it along with an AWS Elastic Load Balancer and perhaps an AWS Route53 DNS entry.
In order to achieve this we will be using Python 3 with Amazon‘s Boto3 library. We will see various snippets showing how to achieve this. A complete, working script can be found on our GitHub account.
Contents
Prerequisites
For the length of this tutorial it will be assumed that you have Docker, Python (2.7 will do) and Boto 3 installed. You should also have the AWS CLI installed and configured, though it is optional.
It will also be assumed that you have a VPC with at least two subnetworks, an internet gateway and working route tables.
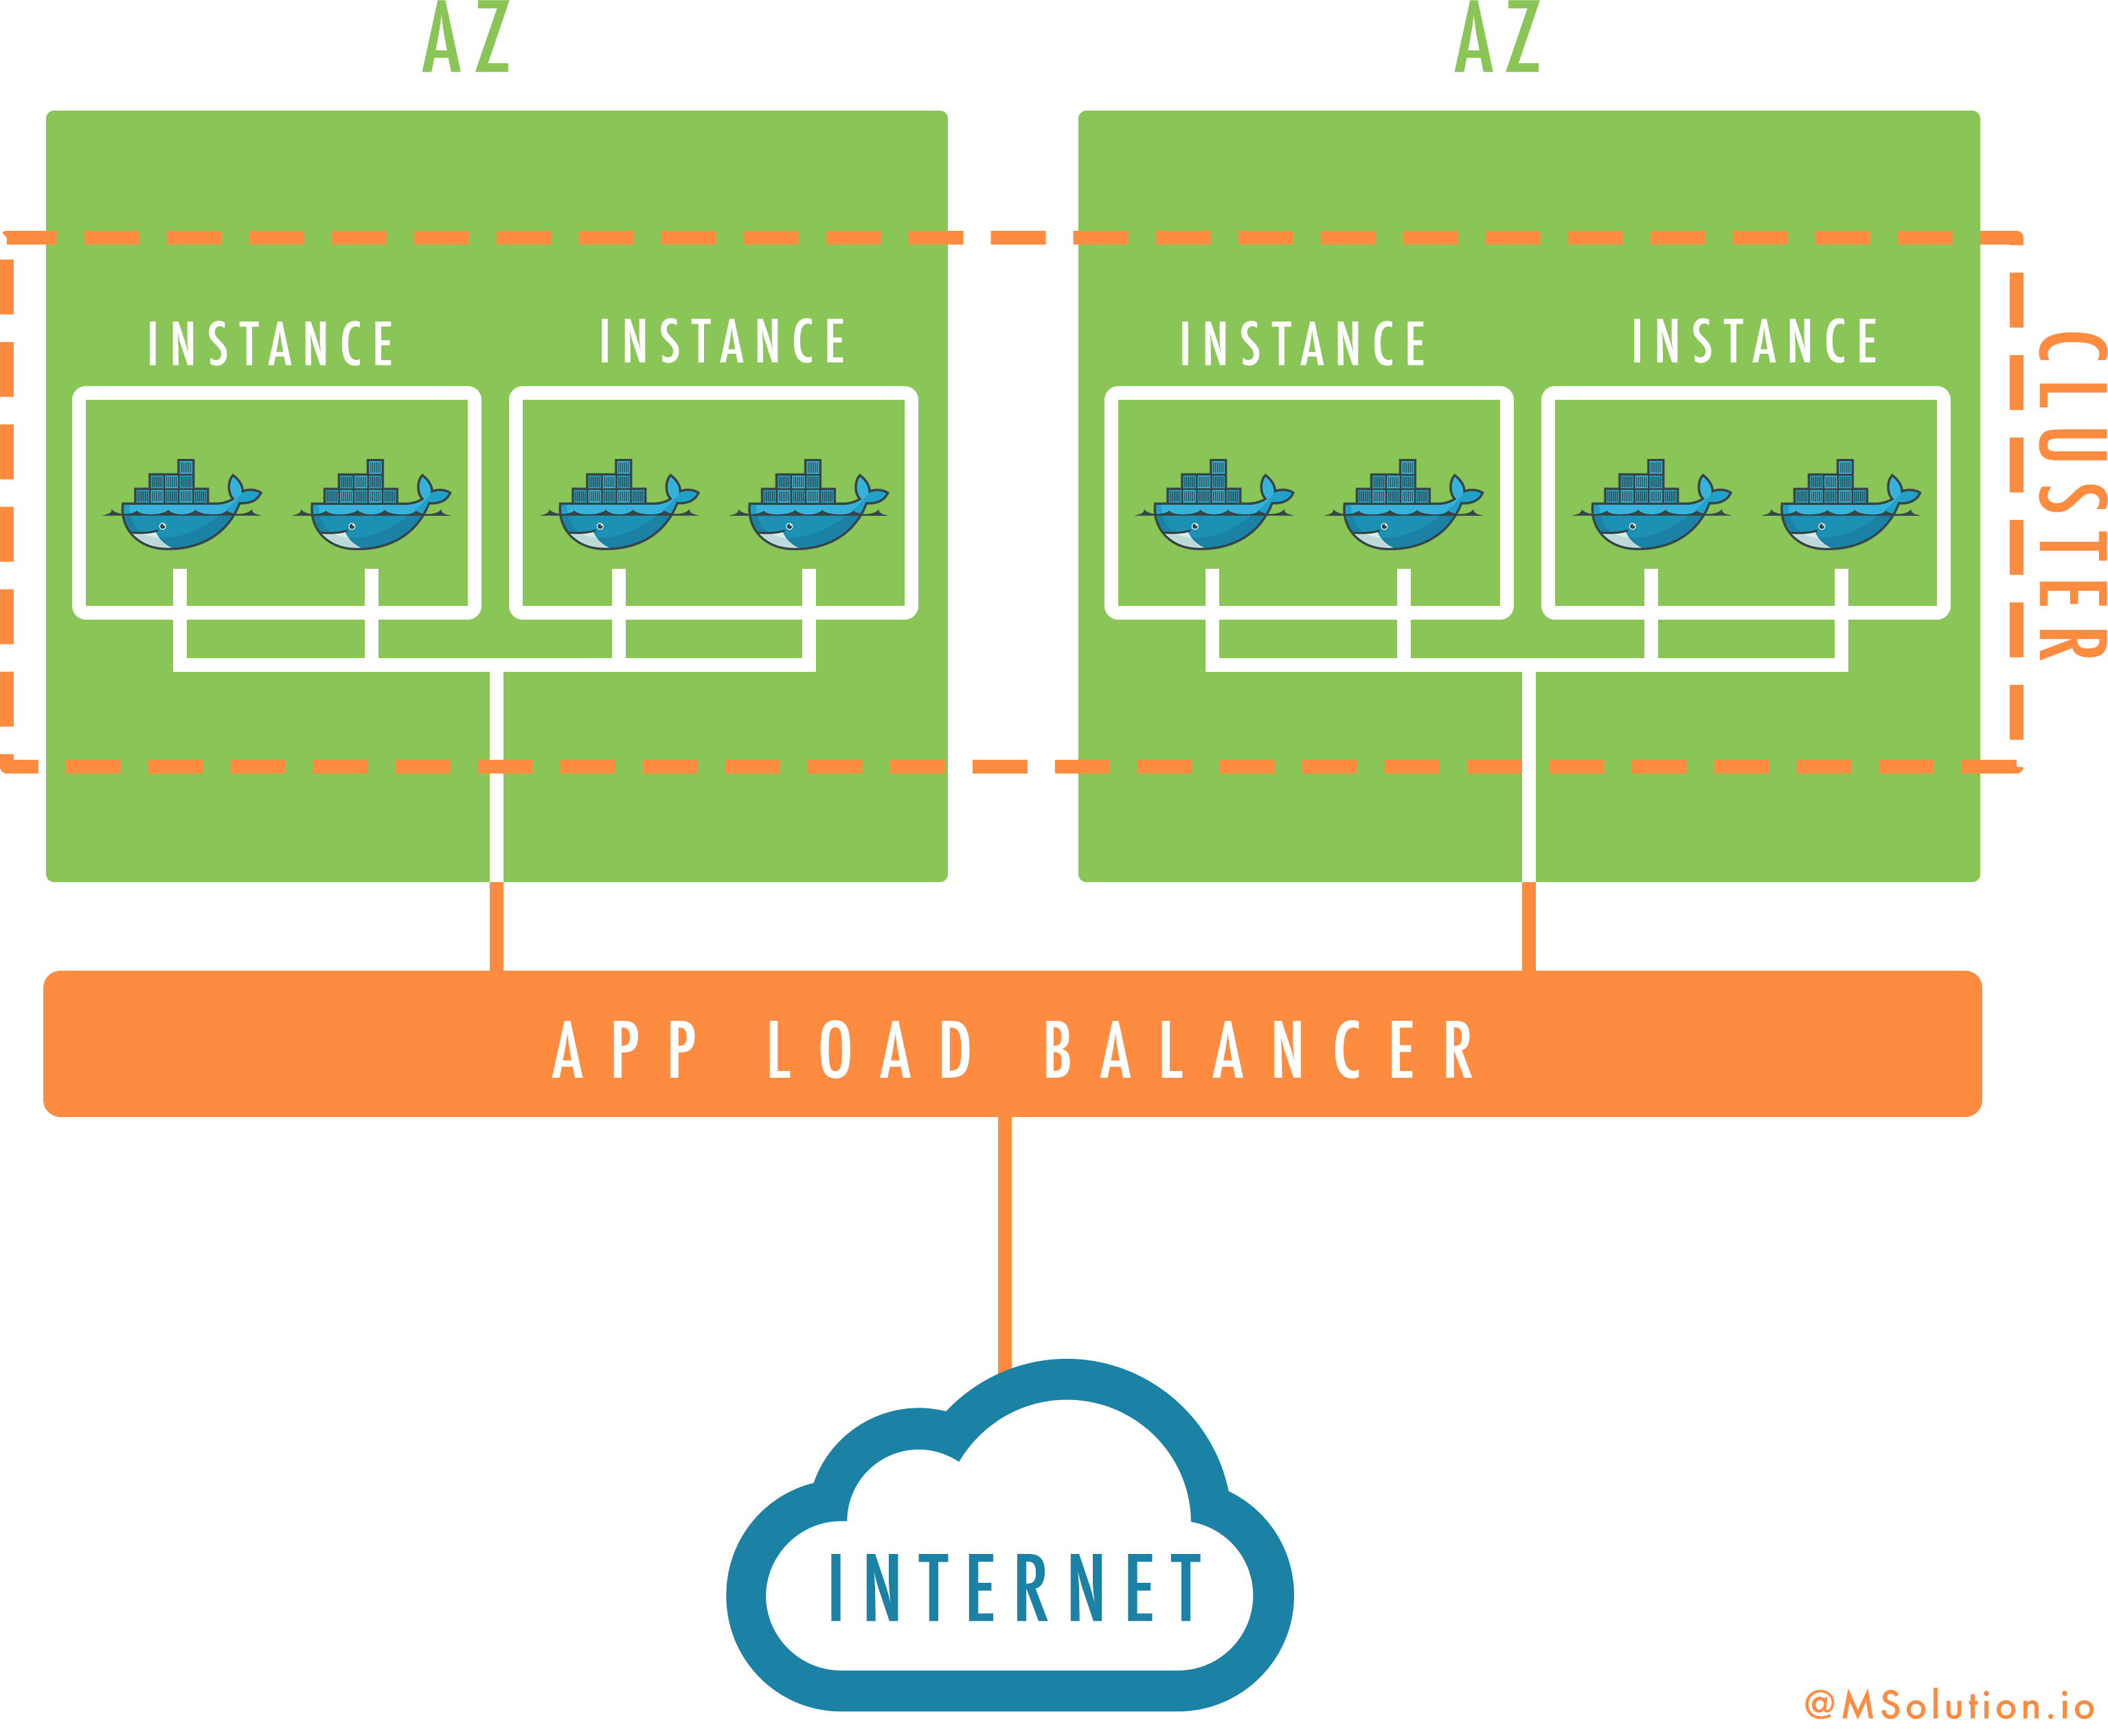
Before to start, let’s have an overview of what we are going to build today:

Creating the AWS ECS task file
AWS‘ and Docker‘s ways of specifying composed services are different and incompatible. As such we must translate our docker-compose file into a task definition. To do this we will use Micah Hausler‘s container-transform utility. There exists a Docker container for his project which allows us to very simply run the following:
$ docker run -i --rm micahhausler/container-transform << EOF | tee task.json
version: '2'
services:
    hello:
        image: helloworld
        ports:
            - "80" # Do not specify host-side port
        environment:
            - FOO=bar
        mem_limit: 256m
        cpu_shares: 10
EOF
{
    "containerDefinitions": [
        {
            "cpu": 10,
            "environment": [
                {
                    "name": "FOO",
                    "value": "bar"
                }
            ],
            "essential": true,
            "image": "helloworld",
            "memory": 256,
            "name": "hello",
            "portMappings": [
                {
                    "hostPort": 80
                }
            ]
        }
    ],
    "family": "",
    "volumes": []
}
Just in case, the ID of the image I am using is
9eba50e73250.
As you can see most properties you usually define in a docker-compose file have their counterpart in the task definition format.
Now this is trivial to automate using Python 3:
import json
import subprocess
import tempfile


def ecs_from_dc(dc_path):
    """Reads a docker-compose file to return an ECS task definition.

    Positional arguments:
    dc_path -- Path to the docker-compose file.
    """
    with open(dc_path, 'r') as dc_file, tempfile.TemporaryFile('w+t') as tmp:
        subprocess.check_call(
            [
                '/usr/bin/env',
                'docker',
                'run',
                '--rm',
                '-i',
                'micahhausler/container-transform'
            ],
            stdin=dc_file,
            stdout=tmp,
        )
        tmp.seek(0)
        ecs_task_definition = json.load(tmp)
        return ecs_task_definition
We will use the return value of this function in order to deploy our service later on.
Setting up the ECS cluster
Registering the AWS ECS task
In order to use our freshly made task definition we must first register it on AWS ECS.
To use the AWS API we will use the Boto 3 SDK. This library implements for us all of the intricacies of using the AWS API such as exponential back-off and Version 4 signatures.
To function, it must have access to a minimal set of configurations: your access key ID, your secret access key and preferred region. If the AWS CLI already works in your environment, you’re already set. Otherwise, you can either install the AWS CLI and run aws configure, or set the AWS_ACCESS_KEY_ID, AWS_SECRET_ACCESS_KEY and AWS_DEFAULT_REGION environment variables.
With your environment ready, you can now use Boto. The first step is to instanciate a boto3.client object, using its constructor. Only then can you use the service’s API. This is illustrated by the following snippet, which defines a function to register your ECS task definition to AWS.
import boto3


ecs = boto3.client('ecs')
"""Client interface for ECS"""


def register_ecs(family, task_role_arn, ecs_task_definition):
    """Register an ECS task definition and return it.

    Positional parameters:
                 family -- the name of the task family
          task_role_arn -- the ARN of the task's role
    ecs_task_definition -- the task definition, as returned by Micah
                           Hausler's script
    """
    ecs_task_definition['family'] = family
    ecs_task_definition['taskRoleArn'] = task_role_arn
    return ecs.register_task_definition(
        family=family,
        taskRoleArn=task_role_arn,
        containerDefinitions=ecs_task_definition,
    )
Using this function we can order AWS to create an ECS cluster your instances will join and your tasks will run on.
Creating the ECS cluster
So now that we have registered the task definition and created an Elastic Load Balancer we want to define the AWS ECS cluster our instances will later participate in. Once again, the ECS client defines a function we can use.
import boto3


ecs = boto3.client('ecs')
"""Client interface for ECS"""


def create_cluster(name):
    """Create an ECS cluster, return it.

    Positional parameters:
    name -- Name for the cluster, must be unique.
    """
    return ecs.create_cluster(
        clusterName=name,
    )
Nothing fancy here, and this is the only parameter this function will accept anyway.
Creating the load balancer
We want an Elastic Load Balancer to be ready for when we finally start our tasks. As such we will create now an Application Load Balancer. Application Load Balancers, as opposed to Classic Load Balancers, give us a more fine-grain control on the targets traffic can be routed to. While Classic Load Balancers nedded a rigid mapping between inbound ports and instance ports, thus forcing all load-balanced instances to expose the exact same port mapping, Application Load Balancers allow us to configure the load-balanced ports of individual instances.
Using this feature we can conceptually register each individual task to the load balancer, without consideration of their container instances. This is handled automatically by ECS though: all we have to do is let ECS know that a task should be load-balanced by a specific load balancer, which we’ll see at a later point.
Once again, Elastic Load Balancers are fairly simple to create. One must be aware, though, that two versions of ELB exist at this time. Only the second version will suit our needs, so we will use the 'elbv2' Boto client.
import boto3


elbv2 = boto3.client('elbv2')
"""Client interface for ELBv2"""


def create_load_balancer(name, subnets, security_groups):
    """Create an Elastic Load Balancer and return it.

    Positional parameters:
               name -- Name of the load balancer
            subnets -- Subnetworks for the load balancer
    security_groups -- Security groups for the load balancer
    """
    return elbv2.create_load_balancer(
        Name=name,
        Subnets=subnets,
        SecurityGroups=security_groups,
    )
Starting the instances
Right now our cluster does exist, a load balancer is ready, but we do not yet have any instances to run our service on. Let’s change that! Using EC2 instances for your cluster requires that the ECS agent be installed and running on each of them; you can either use Amazon‘s ECS optimized AMI, or you can follow their guide on how to install it. For the sake of simplicity, we will use the pre-made AMI; feel free to make your own AMI, though. At the time of this writing, these are the AMIs you should use, depending on your region. The original table can be found here.
| Region | AMI ID |
|---|---|
| us-east-1 | ami-1924770e |
| us-east-2 | ami-bd3e64d8 |
| us-west-1 | ami-7f004b1f |
| us-west-2 | ami-56ed4936 |
| eu-west-1 | ami-c8337dbb |
| eu-central-1 | ami-dd12ebb2 |
| ap-northeast-1 | ami-c8b016a9 |
| ap-southeast-1 | ami-6d22840e |
| ap-southeast-2 | ami-73407d10 |
In order to move forward, you will also need to create roles for both the container instances (ecsInstanceRole) and the AWS ECS service (ecsServiceRole), along with a profile for the container instances so you can give them the role. Amazon has tutorials and explanations for the creation of both of these roles:
Once those roles and profiles are created, we can start the instances, as shown in the following snippet.
import boto3


ec2 = boto3.client('ec2')
"""Client interface for EC2"""


def create_instances(
  ami_id,
  subnet,
  security_groups,
  amount,
  instance_type,
  cluster_name,
  profile_arn,
):
    """Create ECS container instances and return them.

    Positional parameters:
             ami_id -- ID of the AMI for the instances
             subnet -- Subnet for the instances
    security_groups -- Security groups for the instances
             amount -- Amount of instances to run
      instance_type -- Type of the instances
       cluster_name -- Name of the cluster to participate in
        profile_arn -- ARN of the `ecsInstanceProfile' profile
    """
    return ec2.run_instances(
        ImageId=ami_id,
        SecurityGroupIds=security_groups,
        SubnetId=subnet,
        IamInstanceProfile={
            'Arn': profile_arn,
        },
        MinCount=amount,
        MaxCount=amount,
        InstanceType=instance_type,
        UserData="""#!/bin/bash
          echo ECS_CLUSTER={} >> /etc/ecs/ecs.config
        """.format(cluster_name),
    )
It is necessary to provide the cluster name in the instance’s user data so they can now which cluster to connect to. Were it not provided, a default cluster would be created for you.
Starting the service
At that point our cluster would be able to accept any service we’d assign to it. Now onto the service! Right before we start our services, we will need to create a target group. Target groups are used by Application Load Balancers to store all of the nodes they balance, including individual ports. AWS ECS will be able to populate this group with the ports of our tasks; the load balancer will then forward traffic to them.
import boto3


ecs = boto3.client('ecs')
"""Client interface for ECS"""


elbv2 = boto3.client('elbv2')
"""Client interface for ELBv2"""


def create_balanced_service(
  cluster_name,
  family,
  load_balancer_name,
  load_balancer_arn,
  protocol,
  port,
  container_name,
  vpc_id,
  ecs_service_role,
  service_name,
  task_amount,
):
    """Create a service and return it.

    Positional parameters:
          cluster_name -- Name of the cluster
                family -- Family of the task definition
    load_balancer_name -- Name of the load balancer
     load_balancer_arn -- ARN of the load balancer
              protocol -- Protocol of the exposed port
                  port -- Number of the exposed port
        container_name -- Name of the container the port belongs to
                vpc_id -- ID of the current VPC
      ecs_service_role -- ARN of the `ecsServiceRole' role
          service_name -- Name of the service
           task_amount -- Desired amount of tasks
    """
    target_group = elbv2.create_target_group(
        Protocol=protocol,
        Port=port,
        VpcId=vpc_id,
        Name='{}-{}'.format(cluster_name, family),
    )
    target_group_arn = target_group['TargetGroups'][0]['TargetGroupArn']
    elbv2.create_listener(
        LoadBalancerArn=load_balancer_arn,
        Protocol=protocol,
        Port=port,
        DefaultActions=[
            {
                'Type': 'forward',
                'TargetGroupArn': target_group_arn,
            }
        ],
    )
    return ecs.create_service(
        cluster=cluster_name,
        serviceName=service_name,
        taskDefinition=family,
        role=ecs_service_role,
        loadBalancers=[
            {
                'targetGroupArn': target_group_arn,
                'containerName': container_name,
                'containerPort': port,
            }
        ],
        desiredCount=task_amount,
    )
Conclusion
As we showed using the previous snippets, Boto 3 is very apt at automating any part of your infrastructure, and we have all the tools necessary to go from a single docker-compose file to a full-fledged deployment. You can find an example implementation of those snippets on our GitHub page. If you do use this example, do not forget to set the CONFIG dictionnary depending on your needs.
About TrackIt
TrackIt is an international AWS cloud consulting, systems integration, and software development firm headquartered in Marina del Rey, CA.
We have built our reputation on helping media companies architect and implement cost-effective, reliable, and scalable Media & Entertainment workflows in the cloud. These include streaming and on-demand video solutions, media asset management, and archiving, incorporating the latest AI technology to build bespoke media solutions tailored to customer requirements.
Cloud-native software development is at the foundation of what we do. We specialize in Application Modernization, Containerization, Infrastructure as Code and event-driven serverless architectures by leveraging the latest AWS services. Along with our Managed Services offerings which provide 24/7 cloud infrastructure maintenance and support, we are able to provide complete solutions for the media industry.

