In our recently published medium.com article titled ‘Cognito + Amplify Integration Framework’, we have shared a login & authentication boilerplate that enables our clients to kickstart deployments by quickly interfacing their applications with Cognito.
This is a detailed tutorial that describes how we’ve built this boilerplate from scratch.
First, we will create a new project. You don’t need to install or configure tools like webpack or Babel. All the tools you need are preconfigured (and hidden) so that you can focus on the code.
You’ll need to have Node >= 8.10 on your local development machine (but it’s not required on the server). You can use nvm (macOS/Linux) or nvm-windows to switch Node versions between different projects.
To create a new app, you may choose one of the following methods:
#npx
npx create-react-app aws-cognito-boilerplate --template typescript
(npx comes with npm 5.2+ and higher, see instructions for older npm versions)
Or:
#Yarn
yarn create react-app aws-cognito-boilerplate --template typescript
yarn create is available in Yarn 0.25+
We will continue with Yarn
cd aws-cognito-boilerplate

yarn start
Tutorial
AWS Boilerplate Configuration
Now we will configure the project architecture and the tsconfig.json file.
To allow absolute imports and make those imports elegant, we will add a new entry to the compilerOptions of the tsconfig.json file:
{
"compilerOptions": {
….
"noEmit": true,
"jsx": "react",
"baseUrl": "src" / This is the new entry
},
"include": [
"src"
]
}
baseUrl allows us to execute shorter commands in the following format:
Import {something} from ‘shared/utils’
Instead of :
Import {something} from ‘../../shared/utils’
Next we will install the Amplify CLI and the Amplify library to our web application as follows:
yarn global add @aws-amplify/cli

yarn add aws-amplify aws-amplify-react
The Amplify Command Line Interface (CLI) is a unified toolchain to create, integrate, and manage the AWS cloud services for your app. We will use the CLI to initialize our app with Cognito service.
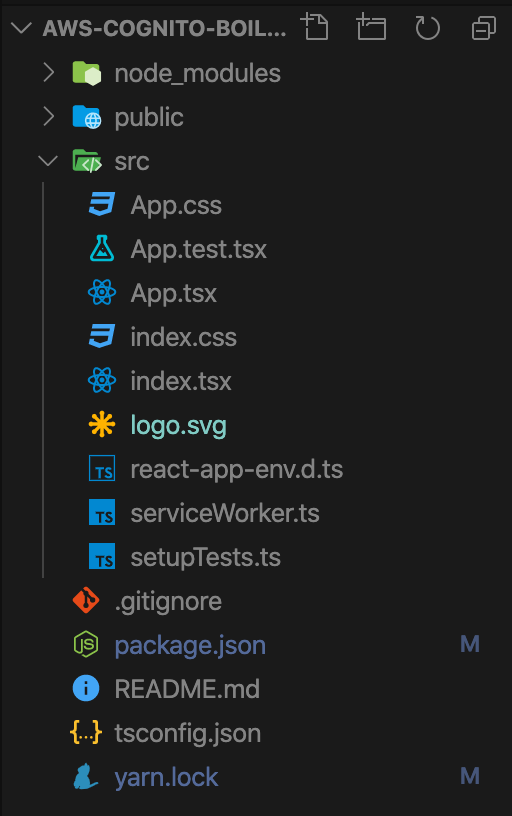
Let’s clean up our project tree:
By removing unneeded files for the moment:
- Logo.svg
- Index.css
- App.test.tsx
- App.css
Now refactor index.tsx:
import React from "react";
import ReactDOM from "react-dom";
import App from "./App";
import * as serviceWorker from "./serviceWorker";

ReactDOM.render(


 ,
 document.getElementById("root")
);
serviceWorker.unregister();
And App.tsx
import React from "react";

const App = () => {
 return (h1)You are logged In(/h1);
};
export default App;
Let’s initialize Amplify with the CLI now.
Before using the CLI, you need to have the credentials for your AWS account in
~/.aws/credentials
Then run:
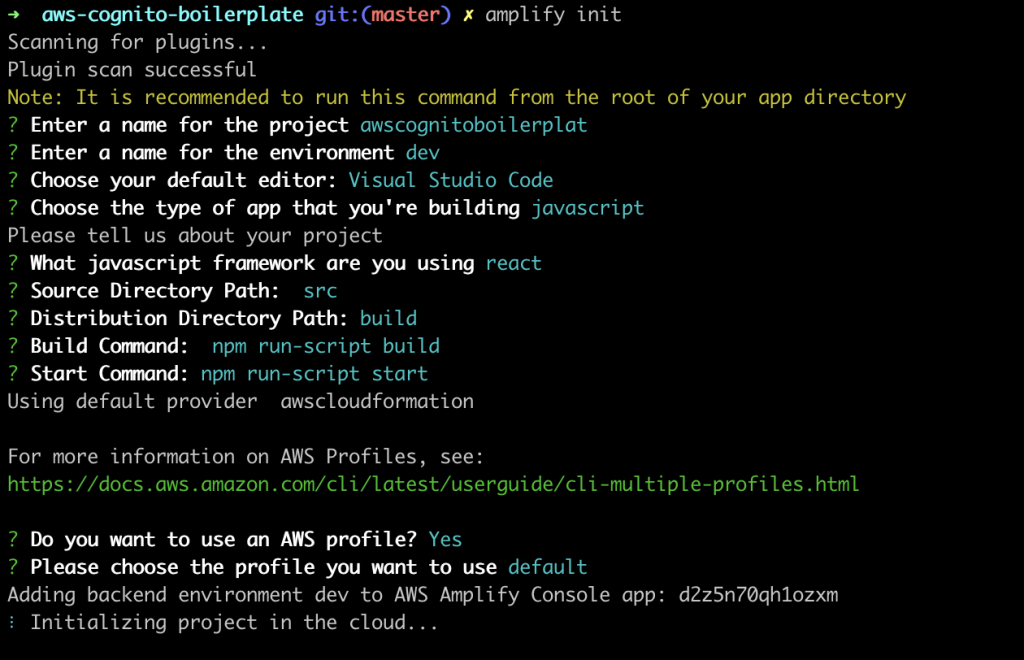
amplify init
After you answer the provided questions, you can use the command amplify help at any time to see the overall command structure, and amplify help <category> to see actions for a specific category.
The Amplify CLI uses AWS CloudFormation; you can add or modify configurations locally before you push them for execution in your account. To see the status of the deployment at any time, run amplify status.
You can add some features like enabling users to register for your site and log in. Run amplify add auth and select the Default configuration. This adds the auth resource configurations locally in your amplify/backend/auth directory.
Run amplify push to provision your auth resources in the cloud. The ./src/aws-exports.js file that’s created has all of the appropriate cloud resources defined for your application.
Now it’s time to configure Amplify with our configuration file.
Let’s create a shared folder inside our src folder:
cd src && mkdir shared
Create an amplify config file:
cd shared && touch amplify.config.ts
amplify.config.ts will be used as a global configuration. Add the following inside:
import "@aws-amplify/ui/dist/style.css";
import { UsernameAttributes } from "aws-amplify-react";

/**
* You can create your own theme and use it to render Amplify components
* Your custom theme must use the selectors from the following
* template: https://github.com/aws-amplify/amplify-js/blob/master/packages/aws-amplify-react/src/Amplify-UI/Amplify-UI-Theme.tsx
*/
const amplifyTheme = {};

/**
* When using custom components you can hide default Amplify components here
* by adding them the amplifyHiddenComponents array
*/
const amplifyHiddenComponents: [] = [];
**
* This object is used by Config.getInstance().init()
* or Amplify.configure() method.
* To add more fields check the following link: https://aws-amplify.github.io/docs/js/authentication#manual-setup
*/
export const amplifyConfig = {
 Auth: {
   identityPoolId: process.env.REACT_APP_IDENTITY_POOL_ID,
   region: process.env.REACT_APP_REGION,
   userPoolId: process.env.REACT_APP_USER_POOL_ID,
   userPoolWebClientId: process.env.REACT_APP_USER_POOL_WEBCLIENT_ID,
 },
 language: "us",
};

/**
* This object is used by Authenticator signUpConfig property
* to configure signUp form. Custom field is a flag which indicates whether or not the field is ‘custom’ in the User Pool.
* For more informations check the following link: https://aws-amplify.github.io/docs/js/react#signup-configuration
*/
export const signUpCustomConfig = {
 hiddenDefaults: ["phone_number"],
 signUpFields: [
   {
     label: "Email",
     key: "email",
     required: true,
     displayOrder: 1,
     type: "string",
     custom: false,
     placeholder: "Enter your email",
   },
   {
     label: "Password",
     key: "password",
     required: true,
     displayOrder: 2,
     type: "password",
     custom: false,
     placeholder: "Enter your password",
   },
 ],
};

/**
* Used by Authenticator component as configuration
*/
export const authenticatorConfig = {
 theme: amplifyTheme,
 usernameAttributes: UsernameAttributes.EMAIL,
 hide: amplifyHiddenComponents,
 signUpConfig: signUpCustomConfig,
};
Create a utils file. This is where we will write our configuration functions.
touch utils.ts
And add the following:
import Amplify from "aws-amplify";

/**
* This function is used to control if the received
* state is equal to the signedIn value.
*
* TODO: We can use lazy loading based on the return of isAuthenticated function.
* Until the user is not connected we don't load unecessary component,
* basically the App components in this context.
* @param {string} state authState returned by onStateChange
*/
export const isAuthenticated = (state: string) => {
 return state === 'signedIn';
};

/**
* This class is used for project configuration.
* It follow a Singleton pattern.
* @extends Amplify Extends Amplify class
*/
export class Config extends Amplify {
 private static instance: Config;

 private constructor() {
   super();
 }

 /**
  * This static method returns class instance if exist,
  * otherwise it returns a new instance
  */
 public static getInstance(): Config {
   if (!Config.instance) {
     Config.instance = new Config();
   }
   return Config.instance;
 }

 /**
  * This method initialize Amplify configuration
  * @example
  * Config.getInstance().init(amplifyConfig)
  */
 / @ts-ignore
 public async init(amplifyConfig) {
   try {
     /**
      * We unfornately have to apply this workaround because Webpack performs
      * a static analyse at build time. It doesn't try to infer variables.
      * For more information check this issue: https://github.com/webpack/webpack/issues/6680#issuecomment-370800037
      */
     const name = 'aws-exports'
     const module = await import(`../${name}`);
     Config.configure(module.default);
   } catch (error) {
     Config.configure(amplifyConfig);
     Config.I18n.setLanguage(amplifyConfig.language || "us");
   }
 }
}
With this class we can use the amplify configuration generated by the CLI or our custom configuration file object inside amplify.config.ts
Now it’s time to refactor our index.tsx file.
import React from "react";
import ReactDOM from "react-dom";
import { Authenticator } from "aws-amplify-react";
import * as serviceWorker from "./serviceWorker";
import { Config, isAuthenticated } from "shared/utils";
import { amplifyConfig, authenticatorConfig } from "shared/amplify.config";
import App from "App";

const Guard = ({ authState }: { authState?: string }) => {
 if (isAuthenticated(authState || "")) {
   return ;
 }
 return null;
};

const CognitoBoilerplate = () => {
 return (


 );
};

/ Wait for Amplify configuration apply
(async () => {
 await Config.getInstance().init(amplifyConfig);
 ReactDOM.render(, document.getElementById("root"));
})();
serviceWorker.unregister();
Let’s add some css inside our public/index.html file at the beginning of the <head> tag
And edit the amplify.config.ts file:
const amplifyTheme = {
 container: {
   backgroundColor: "grey",
   display: "flex",
   justifyContent: "center",
 },
};
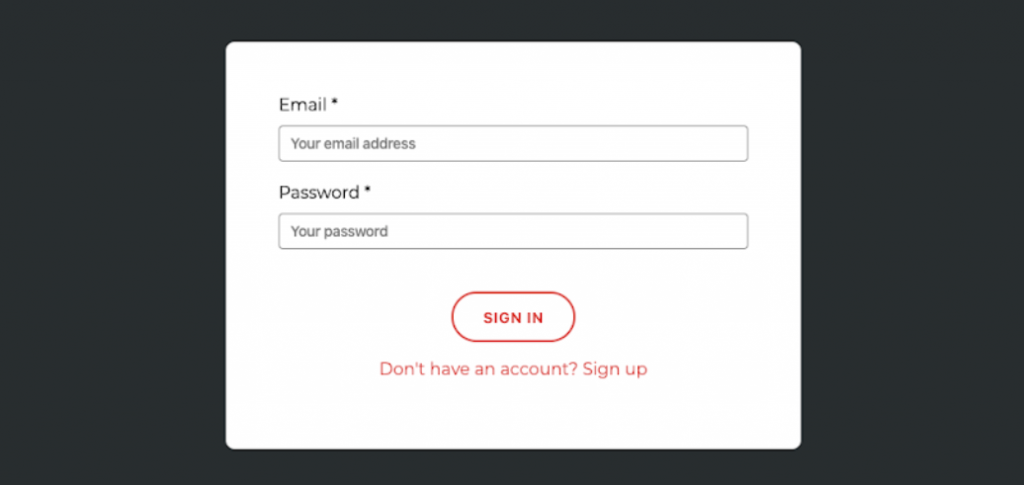
It looks a little better:
Now you can create your own account and sign in:
UI Customization
To customize the components and reuse the render logic along with the built-in methods, we need to extend the original components provided by Amplify using React inheritance.
Let’s create a new folder inside our shared folder:
mkdir -p components/Auth

cd components/Auth
And create a custom SignIn component:
touch SignUp.tsx
Let’s first create a class that extends the desired component, in our case, the Sign In component:
import React from "react";
import { SignIn } from "aws-amplify-react";

class CustomSignIn extends SignIn {
 constructor(props: any) {
   super(props);
 }
}

export default CustomSignIn;
Now, to use our custom component, we have to edit our amplify.config.ts file:
import { ReactNode } from "react";
const amplifyHiddenComponents: ReactNode[] = [SignUp];
Authenticator is designed as a container for a number of Auth components. Each component does a single job, e.g., SignIn, SignUp, etc. By default, all of these elements are visible depending on the authentication state.
If you want to replace some or all of the Authenticator elements, you need to set hideDefault={true}, or if you want to hide only specific components, do it like we did previously so the component doesn’t render its default view. Then you can pass in your own set of child components that listen to authState and decide what to do.
Add your custom sign In component as a child au <Authenticator /> component like the example below:
import React from "react";
import ReactDOM from "react-dom";
import { Authenticator } from "aws-amplify-react";
import * as serviceWorker from "./serviceWorker";
import { Config, isAuthenticated } from "shared/utils";
import { amplifyConfig, authenticatorConfig } from "shared/amplify.config";
import App from "App";
import CustomSignIn from "shared/components/Auth/SignUp";

const CognitoBoilerplate = () => {
 return (


 );
};
The type of props is ISignInProps so we have to import it.
We initialize the state because loading is not initialized inside the parent component. We will use the loading state to disable the button when the request is sent.
this._validAuthStates = [‘signedIn’];
The options above are used to control the condition for the Authenticator component to render components.
import React from "react";
import { ISignInProps } from "aws-amplify-react/lib-esm/Auth/SignIn";
import { SignIn } from "aws-amplify-react";

class CustomSignIn extends SignIn {
 constructor(props: ISignInProps) {
   super(props);
   this._validAuthStates = ["signIn", "signedOut", "signedUp"];
   this.state = {
     loading: false,
   };
 }
}

export default CustomSignIn;
Our CustomSignIn component will be visible when the authState is equal to one of the valid auth states.
Due to inheritance, we have access to parent props, state and methods. Keep in mind that React has a powerful composition model, and it is recommended to use composition instead of inheritance to reuse code between components. In our case, however, we need to inherit aws-amplify-react components.
Now in the component’s constructor, implement showComponent(theme) {} in lieu of the typical render() {} method.
theme is not typed; you can see our custom interfaces at the end of this article by following the Github repository link
import React from "react";
import { ISignInProps } from "aws-amplify-react/lib-esm/Auth/SignIn";

import React from "react";
import { ISignInProps } from "aws-amplify-react/lib-esm/Auth/SignIn";
import { SignIn } from "aws-amplify-react";

class CustomSignIn extends SignIn {
 constructor(props: ISignInProps) {
   super(props);
   this._validAuthStates = ["signIn", "signedOut", "signedUp"];
   this.state = {
     loading: false,
   };
 }

 showComponent(theme: any) {
   return (
     (form>
       (label style={{color: 'white', fontSize: '50px'}}>FORM(/label>
     (/form>
   );
 }
}
export default CustomSignIn;
(you have to replace “(” by “<” in the HTML code, the code embedder we use doesn’t support that)
Now create the custom form using the inherited methods from the parent:
import React, { MouseEvent } from "react";
import { SignIn, UsernameAttributes } from "aws-amplify-react";
import { ISignInProps } from "aws-amplify-react/lib-esm/Auth/SignIn";

class CustomSignIn extends SignIn {
 constructor(props: ISignInProps) {
   super(props);
   this._validAuthStates = ["signIn", "signedOut", "signedUp"];
   this.state = {
     loading: false,
   };
 }

 showComponent(theme: any) {
   return (
     (form>
       (div>
         (label
           style={{ color: "white", fontSize: "30px" }}
           htmlFor={this.props.usernameAttributes}
         >
           Email *
         (/label>
         (br />

         (input
           autoFocus={true}
           type={this.props.usernameAttributes}
           id={this.props.usernameAttributes}
           key={this.props.usernameAttributes}
           name={this.props.usernameAttributes}
           placeholder={
             this.props.usernameAttributes === UsernameAttributes.EMAIL
               ? "Your email address"
               : "Your username"
           }
           onChange={this.handleInputChange}
         />
         (br />
         (br />
       (/div>
       (div>
         (label
           style={{ color: "white", fontSize: "30px" }}
           htmlFor="password"
         >
           Password *
         (/label>

         (br />
         (input
           type="password"
           id="password"
           key="password"
           name="password"
           placeholder="Your password"
           onChange={this.handleInputChange}
         />
         (br />
         (br />
       (/div>
       (button
         disabled={this.state.loading}
         onClick={(ev: MouseEvent) => this.signIn(ev)}
       >
         Sign in
       (/button>
       (br />
       (a
         style={{ color: "white", fontSize: "15px" }}
         onClick={() => this.changeState("signUp")}
       >
         Don't have an account? Sign up
       (/a>
     (/form>
   );
 }
}

export default CustomSignIn;
Now you can customize your component completely by retaining aws-amplify-react component logic.
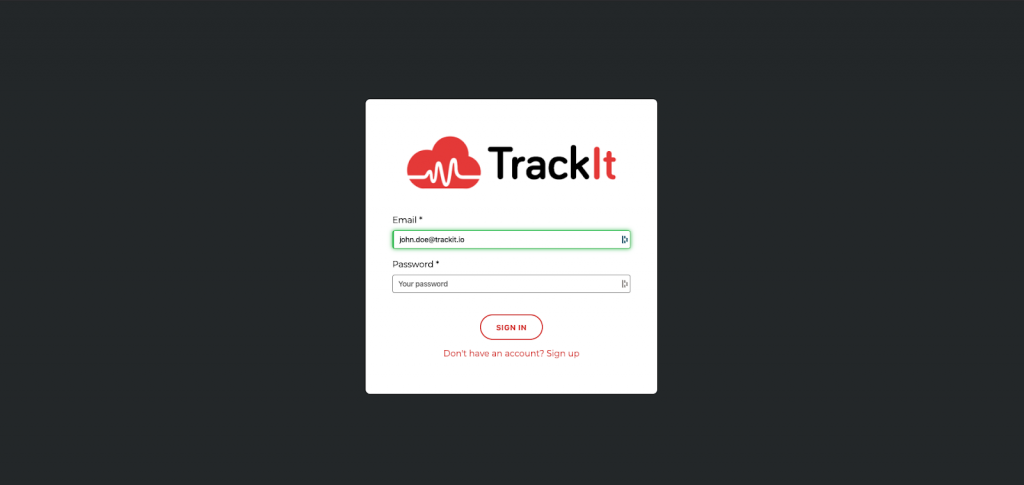
Here is an example of how you can customize your UI’s logo using React inheritance.
To add your logo, you need to display a logo on the Auth components. Often, this logo comes from a URL and thus you need to have a logoUrl property of type “string”. Since you cannot add new properties, you have to pass a component as a child of our component as a workaround.
{/**
        * As a workaround we use a children because we can't add
        * more props from the time that SignIn class is not a generic class.
        */}
       {this.props.children}
GitHub link for the boilerplate: https://github.com/trackit/aws-cognito-boilerplate
You will find the project entirely typed along with styled-components.
About TrackIt
TrackIt is an international AWS cloud consulting, systems integration, and software development firm headquartered in Marina del Rey, CA.
We have built our reputation on helping media companies architect and implement cost-effective, reliable, and scalable Media & Entertainment workflows in the cloud. These include streaming and on-demand video solutions, media asset management, and archiving, incorporating the latest AI technology to build bespoke media solutions tailored to customer requirements.
Cloud-native software development is at the foundation of what we do. We specialize in Application Modernization, Containerization, Infrastructure as Code and event-driven serverless architectures by leveraging the latest AWS services. Along with our Managed Services offerings which provide 24/7 cloud infrastructure maintenance and support, we are able to provide complete solutions for the media industry.


